Monday, June 11, 2012

Flower Basket

This is another project done by my two sisters. Each one of them did the stitch she prefers.


Olive Oil saw this wonderful basket while browsing picasaweb and she felt it would be great if embroidered on a suitable fabric with matching colors.
Here is the link of the album and the pattern:
https://picasaweb.google.com/115441918498191306715/CestasDeFlores


They used satin stitch for the yellow petals and green leaves, crossing lines in the orange center (you can use french knots too), and stem stitch in all the branches. As for the basket's handle and bow, they are done with a tight herringbone stitch. Finally, for the basket they made long lines with a cross at each intersection. I do not know if this method has a name :)

Friday, June 8, 2012

Timmy the Tortoise


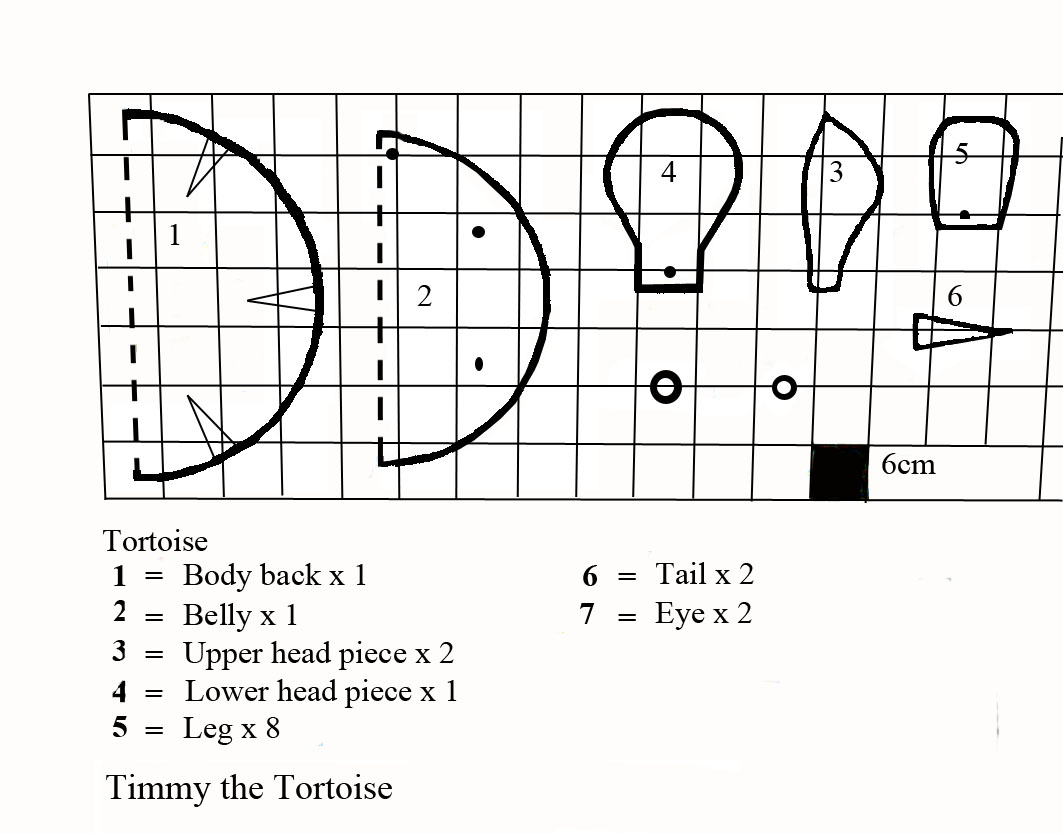
This is Timmy the Tortoise. I saw him for the first time in a book I borrowed from my cousin. I did many projects from the book which I intend to share with you soon. Unfortunately, I do not remember the title. Anyway, here is the pattern and some instructions.

To do this project (36cm across) you will need:
- 40X75cm fabric for the body
- 20X90cm fabric for the head, legs, and tail
- black and white pieces of felt for the eyes
- two colors of yarn for the back
- stuffing


Start by sewing the six darts in the back to make the curves. I prefer to embroider the circles on the back at this stage too, they are done with chain stitch. Then you can join the two body pieces, the head pieces, the legs, and the tail. Take care to sew the head at the marked place in the body, and to do the same with the legs. Finish up with the eyes and mouth.

Timmy can be used as a floor cushion, it can be put on chairs or couches, and it makes a wonderful footrest if it is firmly stuffed.

Enjoy!

Wednesday, June 6, 2012

The Simplest Appetizers Ever


What do you think? Are you tempted to taste this delicious appetizer? It is super easy. We prepared it for my last birthday and it was fun doing and eating. You can prepare it for parties and let your children help and the wonderful thing it looks so professional :)

You will need:
- cherry tomatoes
- Any type of relatively hard cheese (we used Gouda)
- flower-shaped cutters to cut the cheese
- bell pepper
- sausages
- sunbites or toasted bread
- skewers of course
* You can add anything like olives or pickles. Use your imagination!

Just put everything together in skewers and you are done!

Tip: Do not prepare it too early coz sunbites tends to moisturize and become tender.
صنف سهل عشان أعياد الميلاد أو الفطار للأطفال
الحاجات اللي ممكن نستخدمها
عشان نعمل الورد اللي فوق هنحتاج أي نوع جبنة ممكن تتقطع وتستحمل ممكن مثلا جبنة جودة أو شيدر أو فلمنك. نقطعها على شكل ورد بقطاعات البسكوت ونستخدم الطماطم الشيري معاها
باقي الحاجات اللي ممكن نستخدمها صن بايتس أو بداله ممكن نستخدم عيش توست نقطعه أي اشكال صغيرة وممكن نتبله بتوم خفيف وزبدة وندخله يتحمص في الفرن
ممكن نستخدم شرايح فلفل أخضر وفلفل ألوان
سوسيس مستوي ومتقطع حلقات
زيتون أسود أو أخضر
بالنسبة للأعواد لو هنعمل طبقات قليلة ممكن نستخدم خل الأسنان
لو هنستخدم طبقات كتير ممكن تعملوا زيي وتستخدموا عصيان الشيش طاووك بعد ما نقسمها بالنص 

*متجهزوش الصنف ده قبلها بكتير عشان الخضار بطبيعته بيكون جواه مية فممكن العيش أو الصن بايتس يشربها ويطرى*

وبالهنا والشفا
Bon Appetit!

Tuesday, June 5, 2012

Marquetry Flower

فن تعشيق الخشب: من الفنون الجميلة اللي مش كتير بيعملوها محتاجة تركيز ودقة 
بس ممتع جدا ونتيجته تحفة. هو بيستخدم في الموبيليا واللوح لكن بردو بيتعمل من حاجات صغيرة زي علب المناديل والصواني
Marquetry  is the art and craft of applying pieces of veneer to a structure to form decorative patterns, designs or pictures. I really enjoyed that.
Here is my first Marquetry piece
ده رسمة وردة بسيطة متنفذة بتلات أنواع من شرايح الخشب
شرايح الخشب بتتباع في أماكن في العتبة ، ممكن تشتري شريحة من نوع معين أو باكيت فيه أنواع مجمعة

and here is the patten:
وأدي الباترون بتاعها


Marquetry(wikimapia)

Monday, June 4, 2012

A String of Flowers


أي حاجة سادة بالنسبة لي كنز، لإني بأقدر أشتغل عليها براحتي. المرة دي هي بتاعة ماما مش بتاعتي
:D وده مش البلوزة الوحيدة ليها اللي عملت فيها كدة   
This is one of my sister Olive Oil's simplest and most elegant embroidery projects. She worked it on mom's blouse and it gave such an effect.


Mom had sewn this blouse but Olive Oil felt it needed an extra touch. So she drew this 6 petal flower and picked colors that go with it perfectly.
الرسمة في منتهى البساطة وردة ست أوراق واخترت لها لون أخضر وأصفر عشان يمشي مع لون البلوزة


عملت صفين ورود موازيين لصف الزراير. الورد استخدمت فيه غرزة الحشو 
والخطوط اللي بينهم غرزة فرع والنقط الصفراء الصغيرة غرزة الركوكو أو العقدة الفرنسية
(إن شاء الله هأعمل لكم دروس عن غرز التطريز المختلفة )
For this design, she worked a series of roses with satin stitch and the straight lines connecting them with stem stitch with some french knots by the sides.


She embroidered two lines parallel to the button line and another on the cuffs.

نسيت أقول لكم إني عملت على الأساور كمان نفس الرسمة لكن بمقياس رسم أصغر

 :)  جربوا كدة رسومات بسيطة وشوفوا قد ايه بتدي تأثير كبير قوي 

Enjoy!

Sunday, June 3, 2012

A Cawing Crow

This crow is one of the first origami projects I learned as a kid. It is especially fun for a child because it is interactive. If you hold it by the wings and bring them closer and apart, the crow will open and close its mouth while you mimic its cawing sound. Believe me it interests even the adults.


We start with a square of colorful paper. Fold it in half to form two triangles and then unfold it again. We just want the middle line to guide us.


Fold one side of the paper along the middle line.


Then the other side.


Then do the same with the lower part. Note: you can turn the paper upside down and do this step if it is easier for you.


Unfold everything. Make a horizontal crease in the middle of the paper.


Re-fold everything again. You will have an upper triangle and a lower one with two pockets in the middle.
Fold the paper by putting the tip of the lower triangle on the tip of the higher triangle while keeping the two pockets stick outside.


Now you have the base of your crow, its body and two wings.


Fold the upper triangle to start making the lower part of the beak.


Fold it to the left and then to the right as shown.


Use your fingers to form the lower beak.


Do the same steps to the upper part and you will have a perfect beak.


Now all you have to do is join the two wings together and apart while making a caw sound :)

Enjoy!

Saturday, June 2, 2012

Yummy Pasta Flora Recipe

Whatever you say, cooking is a craft. Today we promised our family to prepare something sweet for the family weekly meeting. My sister Shosho baked this yummy Pasta Flora and she wants to share it with you.
بما إننا مقتنعين إن الطبيخ من ضمن الأعمال الفنية، إن لم يكن أهمها، عشان كدة هنقدملكم كيكة الباستا فلورا اللي أختي شوشو عملتها النهاردة وكسرت الدنيا ومفضلش منها ولا قطعة

Since we have a large family, we multiplied the ingredients by four but we will give you the basic recipe which can serve 9 persons.
The Ingredients:
- 1 cup of flour
- 1/3 cup of suger
- 1 egg
- 1 tablespoon butter
- 1/2 teaspoon baking powder
- Vanilla extract
- Jam

ميغركوش شكل المقادير، احنا كنا بنحضر للعيلة كلها فضاعفنا الكمية أربع أضعاف، ولكن المقادير الأساسية اللي تكفي 9 قطع كالتالي
كوب دقيق
ثلث كوب سكر
بيضة
معلقة كبيرة سمن أو زبد
نصف معلقة صغيرة بيكينج باودر
فانيليا
مربى

Start by mixing the sugar and butter, manually or in the mixer.
نبدأ بخلط السكر والسمن جيداً سواءً باليد أو بالمضرب


Add the eggs and vanilla extract and keep mixing.
ثم نضيف البيض والفانيليا ونكمل تقليب


After they are mixed really well, add the flour and baking powder.
بعد ما يختلطوا جيداً نضيف المكونات الجافة اللي هي الدقيق والبيكينج باودر،


Blend the ingredients until it forms a non-sticky dough. Note: If you felt it needs more flour, you can add it until it becomes perfect.
نعجن المكونات كلها لغاية ما نحصل على عجينة مش بتلزق، وممكن نضيف دقيق إذا حسينا إن العجينة محتاجة


Now, spread it in a baking tray, leaving a portion to make the crossing lines atop.
دلوقت نفرد جزء من العجينة في الصينية وبالجزء الباقي نعمل صوابع رفيعة نحطها فوق العجينة بأشكال مربعات أو سمبوكسات


Put a thin layer of jam inside the squares. Today, we used apricot and strawberry jams to please different tastes.
ثم نقوم بوضع طبقة خفيفة من المربى داخل المربعات اللي تكونت، والنهاردة شوشو استخدمت مربى المشمش ومربى الفراولة عشان ترضي جميع الأذواق في العيلة


Finally, bake it for 15 minutes on the highest degree until the color of the dough changes and becomes golden brown.
نخبز الصينية في فرن ساخن لمدة 15 دقيقة أو حتى يحمر الوجه ويصبح ذهبياً جميلاً


Add a second layer of jam when it is still hot and fill the squares as much as you like.
نضيف طبقة ثانية من المربى والكيكة لسة ساخنة ونقدر دلوقت نملأ المربعات جيداً، وبالهنا والشفا
Bon Appetit!


Enjoy!